jenti


mario falchi1and christian fuchsberger2

1Twin Research & Genetic Epidemiology Unit, Kings College London, London
2Institute of Genetic Medicine, European Academy, Bolzano, Italy


Description Documentation Tutorial Download Forum m.falchi@imperial.ac.uk


TABLE OF CONTENTS


Input File Format

Data Management

Cluster(s) identification

Ø  Parameter settings

Ø  Running

Generate the Pedigree(s)

Ø  Parameter settings

Ø  Running

Residuals Management

Data Exploration

Data Exploration


Input File Format

Jenti 
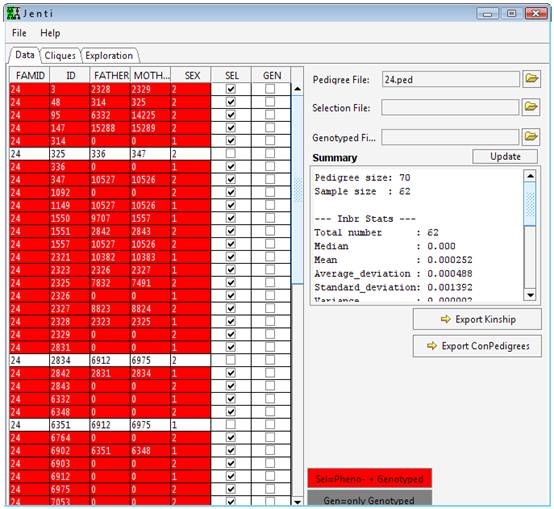
requires a file describing the genealogical data and a selection flag indicating which individuals will be considered in the clustering process and/or in the optional sub-pedigree reconstruction. A separate list of individuals could be also provided in separate files to overriding the selection flags.

The pedigree file describes the relationships between individuals using a standard format. Each row of the file describes a single individual and has the following standard format:


GenealogyID  PersonID FatherID MotherID Sex SelectionFlag


The GenealogyID is a numeric code, unique within the genealogy.


The PersonID is a numeric code that uniquely identifies an individual.


FatherID and MotherID are the numeric codes that specify the individual’s parents. If an individual is a founder each parent identifier field contains a “0”, otherwise the two parents should be present in the same family.


The Sex field contains “1” for a male or “2” for a female.


The SelectionFlag field contains “2” if the individual must be included in the clustering process analysis or “0” if the individual must not be included in the cluster. If the aim of the study is generating sub-pedigrees suitable for family-based studies we would like to include in the sub-pedigrees all the first-degree related individuals having genotype data. This information is provided setting the SelectionFlag to “1”.


All fields must be separated by a single TAB or by comma.


Example: parents and two sons. The sons will be included in the clustering process, the mother has genotypic data.


1          1          0          0          1          0

1          2          0          0          2          1

1          3          1          2          1          2

1          4          1          2          1          2

etc…


The default extension for a genealogy file is “ped”.

Optionally, the lists of individuals to be included in the clustering process or in the sub-pedigree reconstruction step could be provided in separated files listing one PersonID on each line. These data will overwrite the information given in the genealogical file and allows using a single genealogical file for different studies.
Attention PersonID,FatherID and MotherID have to be numeric and not larger than 32000. Thanks to Clemens Egger we can provide an en/decoding tool.


Data management


The DATA tab panel allows selecting the input files needed for the analysis.

Once the input files have been selected, some descriptive statistics will be reported on the right side of the window. The inbreeding and kinship statistics are referred to the selected individuals.

The selection flag for all individuals can be also changed through the data panel. The Update button applies these changes and updates the statistics.


Functions

Export Kinship export the kinship file in text format

Export ConPedigrees This function allows extracting from the genealogy the sub-pedigree connecting all the selected individuals, excluding from the exported pedigree file all the uninformative unselected individuals.


The File menu gives access to basic operations, as to load a genealogy, load a genealogy and remove all the non-informative individuals, show the genealogical data in 2D or 2.5D through PedVizApi (www.fuchsberger.it/pedvizapi).


Jenti could runs out of memory. This is because of the way that Java runs on a computer - what is actually run is a program called a virtual machine (the JVM) which executes the Java instructions. The JVM has limits on the memory that can be allocated to the Java program - and you might need to increase them if you are working with particularly large genealogy. In order to increase the amount of memory for Jenti, the run.bat file should be changed by writing for example:


java –jar –Xms512m –Xmx1024m jenti.jar


This sets the initial and maximum memory size to 512mb and 1025mb. The m suffix can be changed with g to represent gigabyte.


Cluster identification: parameter settings


The CLIQUE panel contains the functions to generate the clique(s).


SETTING THE PARAMETER


The parameters are specified using the panel on the bottom.


Sub-group size

The minimum and maximum size for the clusters.

Can be expressed in the formats “from…to…” or “greater than…”


Kinship range

The minimum and maximum kinship range among all the individuals included in the same cluster.

Can be expressed in the formats “from…to…” or “greater than…”


Extract => All unique sub-groups: extract all the non-overlapping clusters from the genealogy which respect the selection parameters

Extract => Largest sub-group: extract the largest cluster from the genealogy which respect the selection parameters


Permutations: Examine through permutations a number of possible cluster configuration to identify the clique partition that maximize the overall number of informative pairwise relationships. One hundred simulations are empirically sufficient for thousands individuals genealogies. If the program still finds several possible solutions an alert will ask to increase the number of permutations.


Random seed: is the number used by the random number generator to create the permuted datasets.


Cluster identification: Running

Press the  button to run the search.


The results will be shown in the upper panel.


The left screen shows the list of cliques. The list can be sorted clicking any column. The reported statistics among the individuals belonging to the clique can be changed using the radio button “kinship -  inbreeding”. 

The right screen shows the details of each clique.


It is possible to remove an entire clique (left list) or some individuals from a clique (right list), by selecting the corresponding R check-box and pressing the  button. All the removed individuals will be moved to a “Residuals” list and can be used to generate other cliques using a different set of parameters criteria.


The cliques can be saved in a text file pressing the  button.

DATA TAB)


Tip: Evaluating the search with permutations is needed to find the best clustering configuration for large genealogies. However this can slow down the search. At the end of the search a window shows the number of generated groups, the total number of individuals clustered in these groups, the total number of pair-wise relationships, and the seed used to find the best configuration. To repeat in a second time the same search in a shorter time it would be sufficient to set the Random seed to this value and the Permutation field to 0.


Generate the pedigree(s): parameter settings

The PEDIGREE panel contains the functions to generate the pedigree(s) from the cliques.


SETTING THE PARAMETER


The parameters are specified using the panel on the bottom.


Automatic pedigree reconstruction: the sub-pedigrees will be automatically generated trying to preserve most of the kinship among the individuals as observed in the whole genealogy while keeping a small pedigree size.


Max number of meiotic steps through a common ancestor: selecting this option the generated sub-pedigrees will contain all the common ancestors which connect each pair of individuals through the specified number of meiotic steps.


Include all common ancestors: all the common ancestor will be included in the generated sub-pedigrees.


Genetic data

If the aim of the study is generating sub-pedigrees suitable for family-based studies we would like to include in the sub-pedigrees all the first-degree related individuals having genotypic data. Select “include all genotype children”, “include all genotype parents”, or both.


Generate the pedigree(s): Run

Press the  button to run the sub-pedigree reconstruction.

The results will be shown in the upper panel.


The left screen shows the list of sub-pedigrees. The list can be sorted clicking any column.

The right screen shows the details of each sub-pedigree. In red the selected individuals, in white and grey those individuals used to connect the pedigree with (grey) or without (white) genotypic data. On the bottom it is shown, for each pedigree, the kinship and inbreeding coefficients as observed in the genealogy and the kinship and inbreeding coefficients as observed in the sub-pedigree.


It is possible to remove an entire clique (left list) or some individuals from a clique (right list), by selecting the corresponding R check-box and pressing the  button. All the removed individuals will be also removed from the cliques and moved to a “Residuals” list where can be used to generate other cliques using a different set of parameters criteria.


The  button displays the 2D structure of the selected pedigree. If the structure is too complex for the 2D visualization, the 2.5D visualization  can be alternatively used.

The pedigree visualization is powered by PedVizApi (www.fuchsberger.it/pedvizapi).


The sub-pedigrees can be saved in a text file pressing the  button.


HINT: to increase the kinship and inbreeding observed in a sub-pedigree (because for instance is too different from what observed in the whole genealogy), press the  button and increase the maximum allowed number of meiotic steps passing through a common ancestor. Those ancestors included in the specified number of meiotic steps will be added to the sub-pedigree.


Residuals Management

The RESIDUALS panel lists all the selected individuals that didn’t cluster in cliques according to the user parameters, and those individuals manually removed from the cliques and from the pedigrees. Though this tab is possible to use the same functions present in the clique tab and generate new cliques from these individuals. The new cliques can then be moved to the general list (and used to generate the sub-pedigree, when required).


To add a newly generated clique to the general list, select the clique using the check-box and press the  button. To remove a newly generated clique, select the clique using the check-box and press the  button. To remove some individuals from a clique, select the individuals and press the  button situated in the upper-right corner of the panel.


For more information on the parameters used in this form read the “Cluster identification: parameter settings” section.


Data Exploration

The EXPLORATION tab allows evaluating an explorative clustering using predefined increasing kinship ranges to recognize the intrinsic aggregation of the data.

The user specifies a required size range for the extracted sub group(s) and indicates whether the largest sub group or the best partition should be identified.  The kinship range will iterate through increasing degree of relationship, starting from the individuals whose kinship is greater or equal 0.25 (such as parent-offspring or sibs in an outbred population), to the individuals whose kinship is greater or equal 4.88E-4 (such as individuals separated by 11 meiotic steps in an outbred population).


For more information on the parameters used in this form read the “Cluster identification: parameter settings” section.